Multiple xS50 on a L513 (RS485)
-
Hi!
I can't get my modules communicating if there more then 1.
If I connect 1 xS50, put the address to 15 in evoked.conf, and set all 3 dipswitches to off, It works.However; when connecting 3 xS50's, I'm unsure about the steps. (also; can't really make them up from the manuals)
First of all; in all forum items I read the extension modules have 8 dipswitches, mine has 3?
How to configure the dip-switches, and the evok.conf to work?
extension part of evok.conf now:
[EXTENSION_1]
global_id = 2
device_name = xS50
modbus_uart_port = /dev/extcomm/0/0
neuron_uart_circuit = 1_01
allow_register_access = True
address = 1

[EXTENSION_2]
global_id = 3
device_name = xS50
modbus_uart_port = /dev/extcomm/0/0
neuron_uart_circuit = 1_01
allow_register_access = True
address = 2

[EXTENSION_3]
global_id = 4
device_name = xS50
modbus_uart_port = /dev/extcomm/0/0
neuron_uart_circuit = 1_01
allow_register_access = True
address = 3
Dip-switches on modules:
- xS50 #1 = 1 0 0
- xS50 #2 = 0 1 0
- xS50 #3 = 1 1 0
Powerdown all, power up: nothing is recognized. (rx blinks a few times on all modules, then goes steady on)
Is it about the fact that tampering the dip-switches causes the software to lose its communication default?
Regards!
-
Hi @salorob,
you are absolutely right, that this is rather confusing and practically undocumented. I take this as a subtle hint to rework the documentation to be understandable for mere mortals:-)The config file snippet you sent looks more or less OK. You specified the Modbus slave addresses and the serial ports. But to have this working correctly, you need to configure the serial line speed as well. Right now, you can do this in two different manners:
-
In the config file
If you look at the sample configuration file: https://github.com/UniPiTechnology/evok/blob/master/etc/evok-neuron.conf, you can see the necessary options: baud_rate, parity and stop_bits, which you need to include in all extension sections of the config file. This option works only when you use the UniPian image! -
Using EVOK's API
Second option is to set this via EVOK's API and this works even when you are running EVOK on the Raspbian image. The simplest way is to open the EVOK's WEB UI and click on System on the top menu. You should see similar interface:
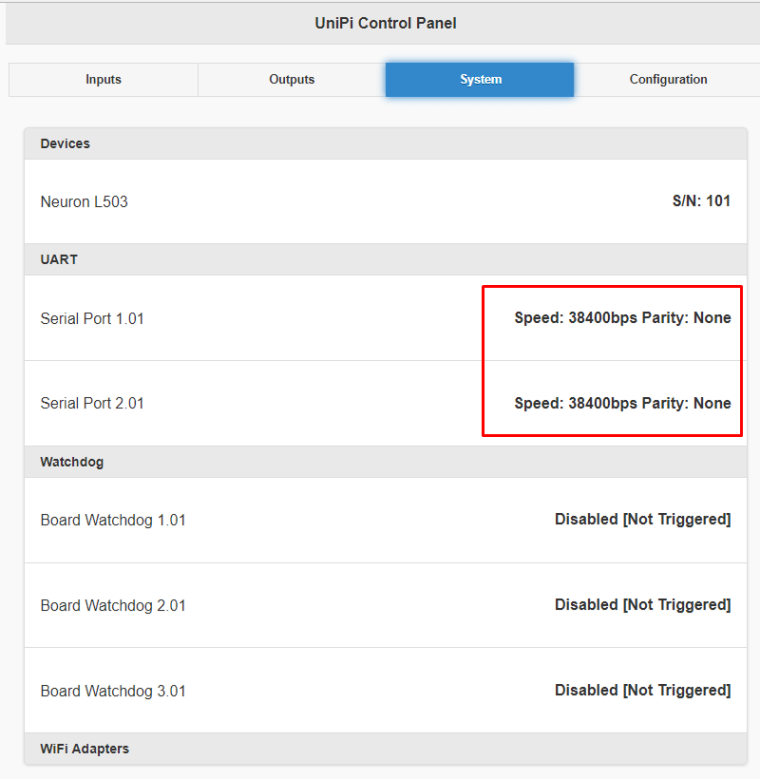
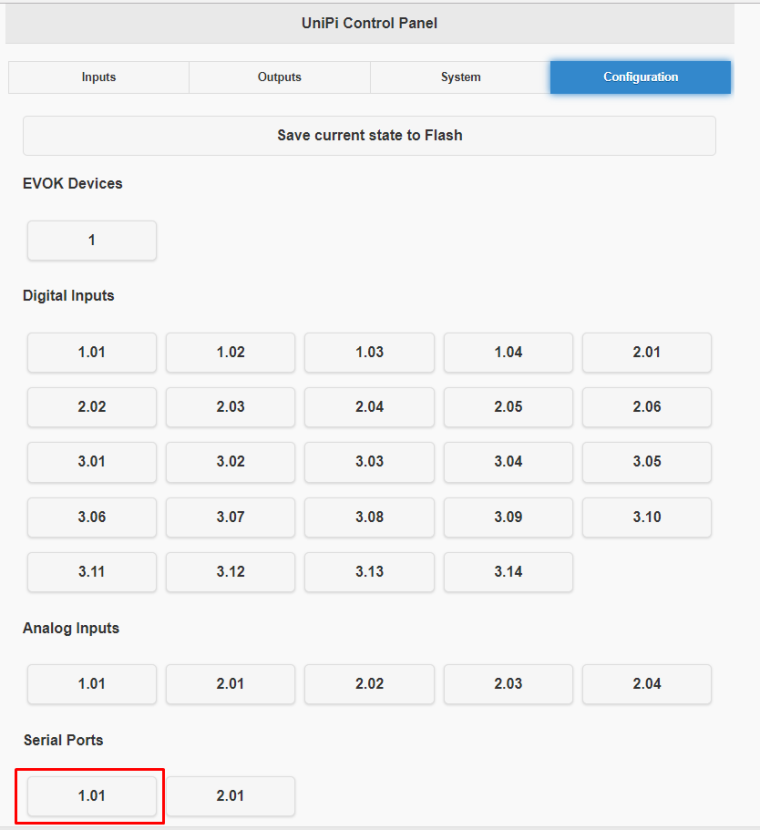
As you can see, I have 2 RS485 ports on my L503 and both are configured as 38400 with no parity. To change the settings, click on the Configuration in the top menu. On the configuration page click on the serial port button you want to change:
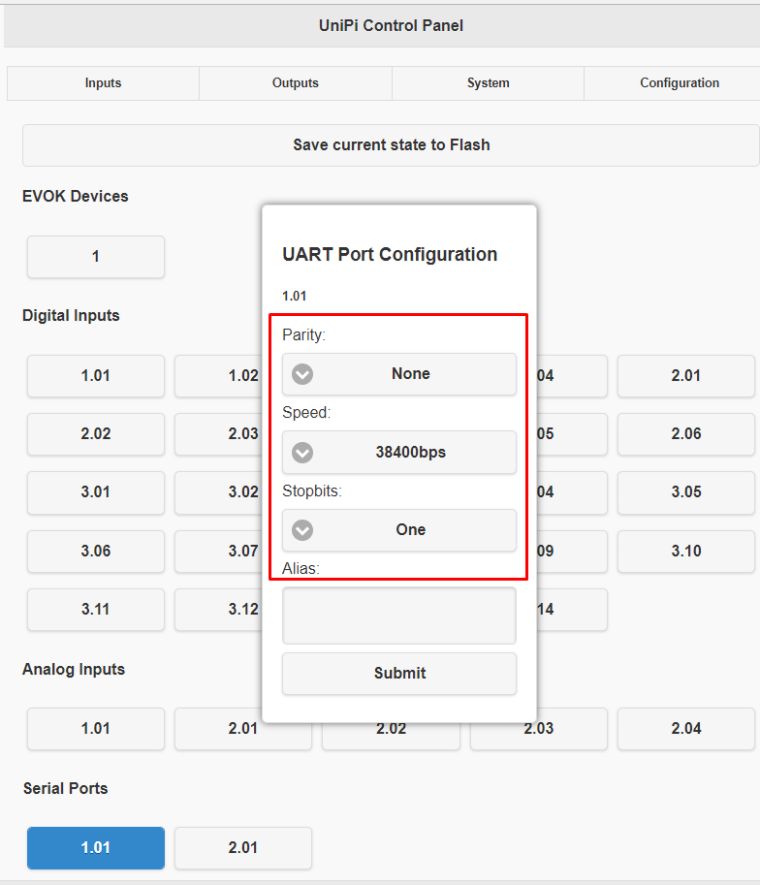
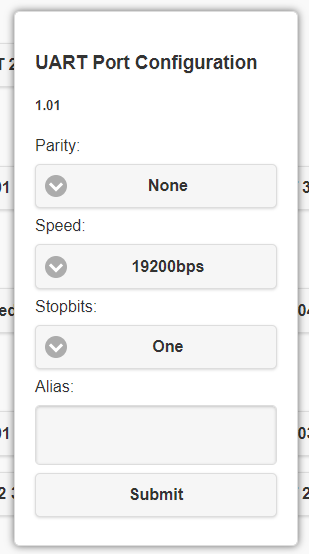
A serial port configuration dialog will appear and you can set all the parameters. Change them according to your UniPi Extensions and confirm by clicking on Submit.
The configuration dialog will be closed. Now you need to save the changed settings by clicking on the Save current state to Flash.
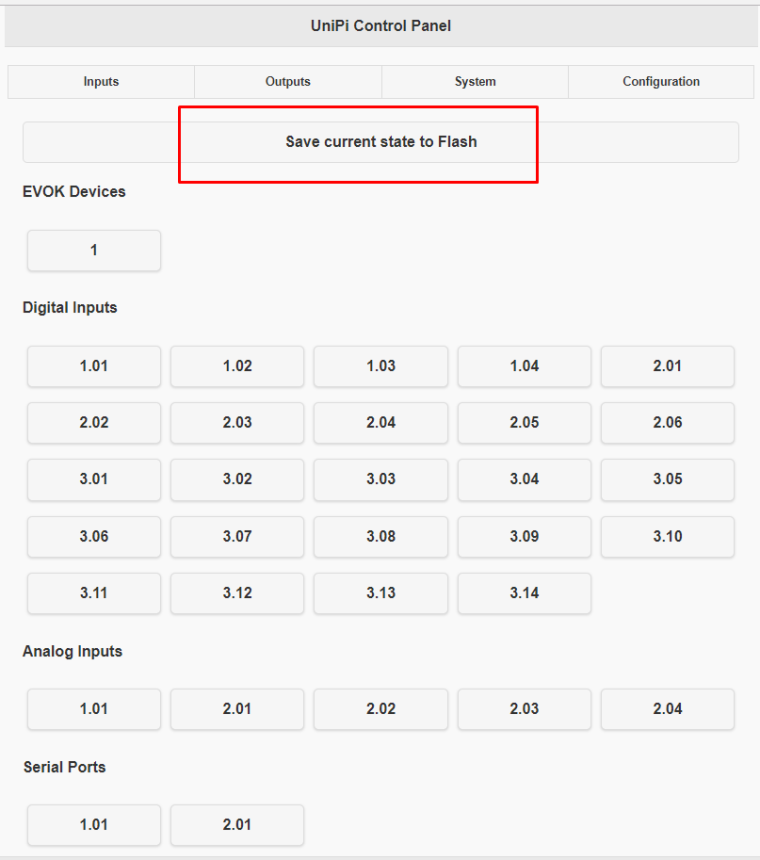
And that's it. You should by able to see the extension's ports in the UI as well after reboot.
Martin
PS. And you are right about xS50 having only 3 DIP switches - for setting slave address 0 - 7. Simply, there wasn't enough space for all 8, as the other extension have:-)
-
-
Hi Martin,
Thank you for your response.
I connected all to the same (first) UART, and that UART is already set like that from EVOK: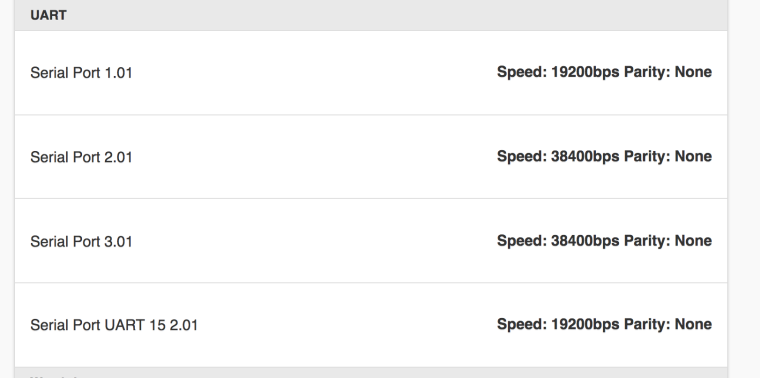
So; leaves me with the questions
- Is my dip-switch setting as mentioned alright on de xS50 modules ?
- What are the defaults on a xS50 module for communication settings
-
Hi @salorob,
- on xS50, you can set only address by DIP switches. The DIP switch settings has to match the address parameter in evok.conf
- The default serial line configuration of the extension is 19200bps, 8 data bits, no parity and 1 stop bit, so change the serial line settings in the EVOK accordingly.
Martin
PS. And thanks for another hint - the default settings of EVOK should reflect the defaults of the extensions.
-
Okay, changed some things to be precise like you say, but still no comms on none of the modules
[EXTENSION_1]
global_id = 2                                                   ; Mandatory, REQUIRED TO BE UNIQUE
device_name = xS50                                              ; Mandatory
modbus_uart_port = /dev/extcomm/0/0     ; Mandatory
neuron_uart_circuit = 1_01                              ; Optional, allows associating extensions with specific Neuron UART-over-Modbus ports (not possible for non-Modbus UART ports, e.g. /dev/ttyUSB0 or /dev/ttyS0)
allow_register_access = True                    ; Optional, False default, is mandatory with third-party devices
address = 1                                                     ; Optional, 1 default
scan_frequency = 10                                    ; Optional, 10 default
scan_enabled = True                                    ; Optional, True default
; Note that the following settings will be inherited by other devices sharing the same port, i.e. /dev/extcomm/0/0
baud_rate = 19200                                               ; Optional, NEEDS UNIPI IMAGE TO WORK! USE API TO CONFIGURE UART MANUALLY IF USING STANDARD RASPBIAN
parity = N                                                              ; Optional, NEEDS UNIPI IMAGE TO WORK! USE API TO CONFIGURE UART MANUALLY IF USING STANDARD RASPBIAN
stop_bits = 1                                                   ; Optional, NEEDS UNIPI IMAGE TO WORK! USE API TO CONFIGURE UART MANUALLY IF USING STANDARD RASPBIAN

[EXTENSION_2]
global_id = 3                                                   ; Mandatory, REQUIRED TO BE UNIQUE
device_name = xS50                                              ; Mandatory
modbus_uart_port = /dev/extcomm/0/0     ; Mandatory
neuron_uart_circuit = 1_01                              ; Optional, allows associating extensions with specific Neuron UART-over-Modbus ports (not possible for non-Modbus UART ports, e.g. /dev/ttyUSB0 or /dev/ttyS0)
allow_register_access = True                    ; Optional, False default, is mandatory with third-party devices
address = 2                                                     ; Optional, 1 default
scan_frequency = 10                                     ; Optional, 10 default
scan_enabled = True                                     ; Optional, True default
; Note that the following settings will be inherited by other devices sharing the same port, i.e. /dev/extcomm/0/0
baud_rate = 19200                                               ; Optional, NEEDS UNIPI IMAGE TO WORK! USE API TO CONFIGURE UART MANUALLY IF USING STANDARD RASPBIAN
parity = N                                                              ; Optional, NEEDS UNIPI IMAGE TO WORK! USE API TO CONFIGURE UART MANUALLY IF USING STANDARD RASPBIAN
stop_bits = 1                                                   ; Optional, NEEDS UNIPI IMAGE TO WORK! USE API TO CONFIGURE UART MANUALLY IF USING STANDARD RASPBIAN

[EXTENSION_3]
global_id = 4                                                   ; Mandatory, REQUIRED TO BE UNIQUE
device_name = xS50                                              ; Mandatory
modbus_uart_port = /dev/extcomm/0/0     ; Mandatory
neuron_uart_circuit = 1_01                              ; Optional, allows associating extensions with specific Neuron UART-over-Modbus ports (not possible for non-Modbus UART ports, e.g. /dev/ttyUSB0 or /dev/ttyS0)
allow_register_access = True                    ; Optional, False default, is mandatory with third-party devices
address = 3                                                     ; Optional, 1 default
scan_frequency = 10                                     ; Optional, 10 default
scan_enabled = True                                     ; Optional, True default
; Note that the following settings will be inherited by other devices sharing the same port, i.e. /dev/extcomm/0/0
baud_rate = 19200                                               ; Optional, NEEDS UNIPI IMAGE TO WORK! USE API TO CONFIGURE UART MANUALLY IF USING STANDARD RASPBIAN
parity = N                                                              ; Optional, NEEDS UNIPI IMAGE TO WORK! USE API TO CONFIGURE UART MANUALLY IF USING STANDARD RASPBIAN
stop_bits = 1                                                   ; Optional, NEEDS UNIPI IMAGE TO WORK! USE API TO CONFIGURE UART MANUALLY IF USING STANDARD RASPBIAN
with these dip-switch settings:
Dip-switches on modules:- xS50 #1 = 1 0 0 = EXTENSION_1, address = 1
- xS50 #2 = 0 1 0 = EXTENSION_2, address = 2
- xS50 #3 = 1 1 0 = EXTENSION_3, address = 3
Please note they are al on the first UART: 1.1 - RS485. Does that make a difference?
p.s. I used a default Raspbian stretch image (so not one of you're images), and used your install scripts like so:
sudo su
wget https://github.com/UniPiTechnology/evok/archive/v.2.0.7.zip
unzip v.2.0.7.zip
cd evok-v.2.0.7
bash install-evok.sh
Is that any problem?
-
Let's investigate:
- Did you restart the Neuron after changing the settings (or at least the evok service)?
- what Raspbian image do you use ? Please, paste the output of the
uname -a.
We are probably (not confirmed, working on it) experiencing an issue with running the EVOK on the up-to-date Raspbian
M.
-
- Yes; I'm very neurotic on that, I rebooted the L513, and made the extensions powerless also.
- As for the version, I'm using the latest Debian, (downloaded it from the website last week?):
Linux raspberrypi 4.14.50-v7+ #1122 SMP Tue Jun 19 12:26:26 BST 2018 armv7l GNU/Linux -
That seems to be OK. I will have to reproduce your setup, but I'm not sure, if I will be able to make it today. Tommorow morning for sure.
M.
-
OK, I partially reproduced your setup. I have:
- Neuron L503 with latest, up-to-date Raspbian (
Linux raspberrypi 4.14.52-v7+ #1123 SMP Wed Jun 27 17:35:49 BST 2018 armv7l GNU/Linux), and EVOK 2.0.7. Serial line 1.1 configured with 19200bps, 8N1:
- One extension xS40 with address 3 (DIPs 3 and 4 are down):
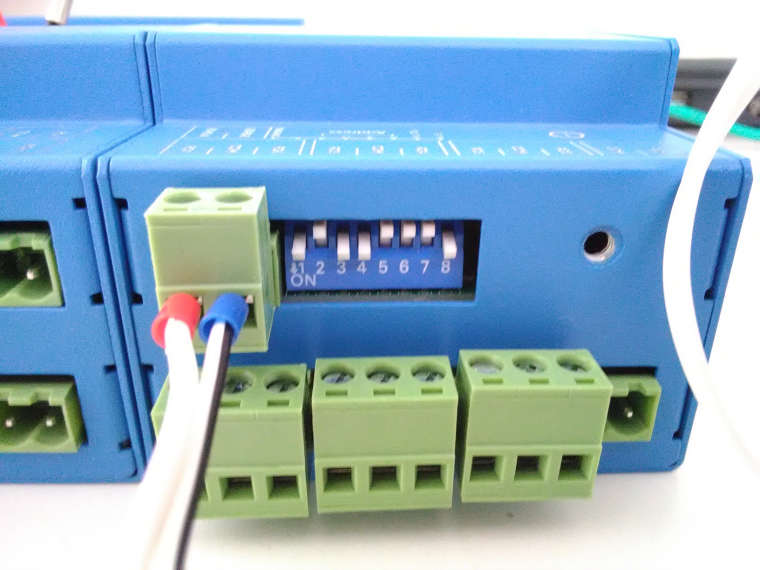
- Another extension xS50 with address 2 (DIP 2 is up):
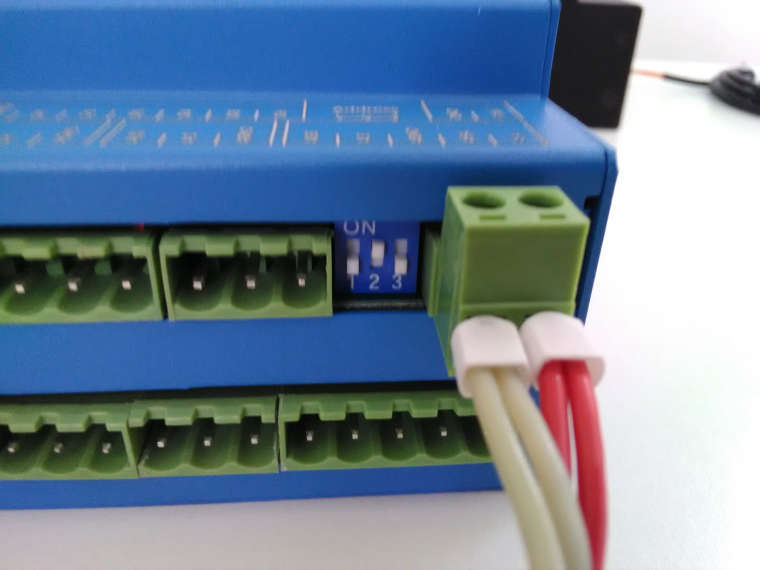
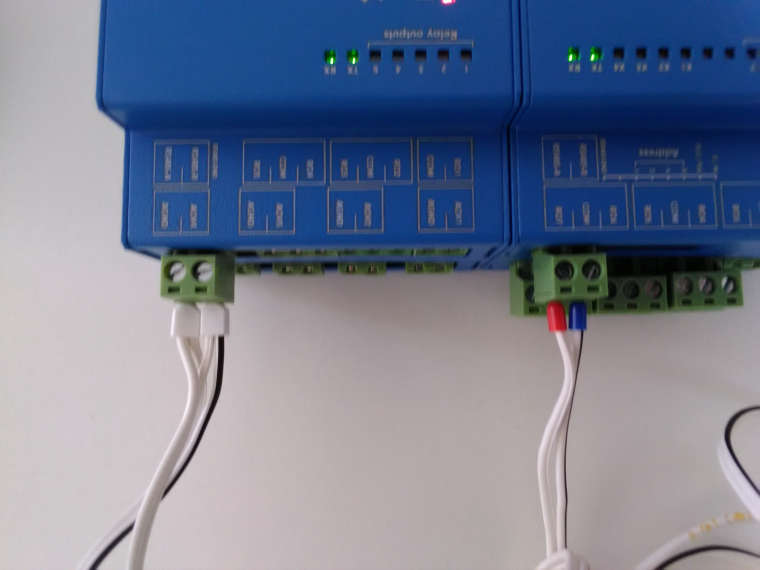
- Extensions and Neuron are connected with all RS485 "As" connected together and RS485 "Bs" connected together:
- The configuration in the evok.conf is this one:
#!!! Do not use '#' for comments !!! [MAIN] config_version = 2.5 ; Configuration file version, DO NOT CHANGE! use_schema_verification = False ; Enabling this will deny any requests that do not match the JSON Schema; NOTE THAT THIS RESULTS IN A SIGNIFICANT INCREASE IN LATENCY AND SHOULD NOT BE USED EXCEPT FOR TESTING log_level = ERROR ; Minimum severity of messages to be logged; one of INFO, DEBUG, WARNING, ERROR, CRITICAL log_file = /var/log/evok.log ; Log file to use; will be cleared on boot port = 8080 ; !!! Internal API port - only change if you are certain you know what you are doing; FOR OUR WEB INTERFACE THE PORT SHOULD BE CHANGED IN "/etc/evok-nginx.conf" INSTEAD !!! webhook_enabled = False ; Enables webhook notification - see e.g. https://sendgrid.com/blog/whats-webhook/ webhook_address = http://127.0.0.1:80 ; Put your server endpoint address here (e.g. http://123.123.123.123:/wh ) webhook_device_mask = ["input","wd"] ; List of device types to notify on (written as a JSON list) - adding AI will generate a large amount of messages! webhook_complex_events = False ; EVOK will send POST requests with the same data as WebSocket, rather than an empty GET request wifi_control_enabled = False ; !!! REQUIRES THE UNIPIAP WIFI CONTROLLER TO BE INSTALLED !!! Will allow evok to control the internal Neuron wifi soap_server_enabled = False ; Enables the simple SOAP server; use only if you need the functionality soap_server_port = 8081 ; !!! IF SOAP SERVER IS ENABLED, THIS PORT NEEDS TO BE UNIQUE (i.e. different from the port setting above) !!! [NEURON_1] global_id = 1 ; Mandatory, REQUIRED TO BE UNIQUE allow_register_access = False ; Optional, False default scan_frequency = 10 ; Optional, 10 default scan_enabled = True ; Optional, True default ; Below you can find examples for connecting devices over UART; first example is a Neuron extension while the second is a custom third-party device ; Devices sharing a port use the port settings of the first device on that port (baud rate, parity, stopbits) ; !!!Note that device_name has to match a filename in the /etc/hw_definitions directory!!! See /etc/hw_definitions/DOMAT MMIO.yaml for an example [EXTENSION_1] global_id = 2 ; Mandatory, REQUIRED TO BE UNIQUE device_name = xS40 ; Mandatory modbus_uart_port = /dev/extcomm/0/0 ; Mandatory ;neuron_uart_circuit = 1_01 ; Optional, allows associating extensions with specific Neuron UART-over-Modbus ports (not possible for non-Modbus UART ports, e.g. /dev/ttyUSB0 or /dev/ttyS0) ;allow_register_access = True ; Optional, False default, is mandatory with third-party devices address = 3 ; Optional, 1 default ;scan_frequency = 10 ; Optional, 10 default ;scan_enabled = True ; Optional, True default ; Note that the following settings will be inherited by other devices sharing the same port, i.e. /dev/extcomm/0/0 ;baud_rate = 19200 ; Optional, NEEDS UNIPI IMAGE TO WORK! USE API TO CONFIGURE UART MANUALLY IF USING STANDARD RASPBIAN ;parity = N ; Optional, NEEDS UNIPI IMAGE TO WORK! USE API TO CONFIGURE UART MANUALLY IF USING STANDARD RASPBIAN ;stop_bits = 1 ; Optional, NEEDS UNIPI IMAGE TO WORK! USE API TO CONFIGURE UART MANUALLY IF USING STANDARD RASPBIAN [EXTENSION_2] global_id = 3 ; Mandatory, REQUIRED TO BE UNIQUE device_name = xS50 ; Mandatory modbus_uart_port = /dev/extcomm/0/0 ; Mandatory ;neuron_uart_circuit = 1_01 ; Optional, allows associating extensions with specific Neuron UART-over-Modbus ports (not possible for non-Modbus UART ports, e.g. /dev/ttyUSB0 or /dev/ttyS0) ;allow_register_access = True ; Optional, False default, is mandatory with third-party devices address = 2 ; Optional, 1 default ;scan_frequency = 10 ; Optional, 10 default ;scan_enabled = True ; Optional, True default ; Note that the following settings will be inherited by other devices sharing the same port, i.e. /dev/extcomm/0/0 ;baud_rate = 19200 ; Optional, NEEDS UNIPI IMAGE TO WORK! USE API TO CONFIGURE UART MANUALLY IF USING STANDARD RASPBIAN ;parity = N ; Optional, NEEDS UNIPI IMAGE TO WORK! USE API TO CONFIGURE UART MANUALLY IF USING STANDARD RASPBIAN ;stop_bits = 1 ; Optional, NEEDS UNIPI IMAGE TO WORK! USE API TO CONFIGURE UART MANUALLY IF USING STANDARD RASPBIAN ;[EXTENSION_2] ;global_id = 3 ; Mandatory, REQUIRED TO BE UNIQUE ;device_name = CUSTOM MODBUS DEVICE ; Mandatory ;modbus_uart_port = /dev/extcomm/0/0 ; Mandatory ;neuron_uart_circuit = 1_01 ; Optional, allows associating extensions with specific Neuron UART-over-Modbus ports (not possible for non-Modbus UART ports, e.g. /dev/ttyUSB0 or /dev/ttyS0) ;allow_register_access = True ; Mandatory with third-party devices ;address = 1 ; Optional, 15 default ;scan_frequency = 2 ; Optional, 1 default ;scan_enabled = True ; Optional, True default [OWBUS_1] owbus = /dev/i2c-1 --i2c=/dev/i2c-1:ALL ; Scanned bus (--i2c=/dev/i2c-1:ALL or localhost:2122 or 'u' for USB dongle) interval = 3 ; [s] Default sensor reading scan_interval = 300 ; [s] How often is scanning done ;Example of 1W-4R/4DI extension module, 1W-8R is almost the same, only with inputs instead of relays ; ; - Map a new 1Wire sensor with the appropriate address, type and interval ; - The syntax can be either SENSOR or 1WDEVICE ; - Setting the correct reading interval is crucial to achieve ideal performance; the default interval is 15s ; ;[1WDEVICE_2] ;bus = 1 ;address = 29F39A17000000BC ;type = DS2408 ;interval = 1 ; ;[1WRELAY_10] ;sensor = 2 ;pin = 0 ; ;[1WRELAY_11] ;sensor = 2 ;pin = 1 ; ;[1WRELAY_12] ;sensor = 2 ;pin = 2 ; ;[1WRELAY_13] ;sensor = 2 ;pin = 3 ; ;[1WINPUT_20] ;sensor = 2 ;pin = 4 ; ;[1WINPUT_21] ;sensor = 2 ;pin = 5 ; ;[1WINPUT_22] ;sensor = 2 ;pin = 6 ; ;[1WINPUT_23] ;sensor = 2 ;pin = 7- After restarting the evok (
service restart evok), the devices and their inputs/outputs were immediatelly available in the Web UI:

Can you check your setup against mine above? Try simplifying the extension's configuration as I did.
M.
- Neuron L503 with latest, up-to-date Raspbian (
-
I wil have to check in a minute.
As far as I can remember from testing yesterday; even if I connect just 1 module, which I give a fixed address with the dipswitch (say; dip 1 = up, makes address = 1 (right?)), and configure the evok.conf accordingly, it won't work.So in my opinion, setting an address manually by dip-switch, causes something to go wrong. Either I don't understand how the dip's represent an address, or something else goes haywire...
however; I didn't check with the
;neuron_uart_circuit = 1_01commented like in your example, wil check that in a minute.What does this option do anyway ?
-
So; another quick test:
-
If I connect just 1 xS50, which I give a fixed address with the dipswitch (dip 1 = up, makes address = 1 (right?)), and configure the evok.conf accordingly, and configure the serial speed, it won't work.
-
All dip's down, on evok address 15, it works.
-
-
Hi,
this really seems to be an issue on our part, probably related to the firmware of the extensions. You are not the only one having the exactly same problem (see https://forum.unipi.technology/topic/652/how-to-add-xs40-to-neuron-l203-using-custom-software/42). We will investigate it a bit more and let you know as soon as possible.Thank you for your patience,
Martin -
Ah.. okay. Well, at least I'm not crazy.
Please let me know, I need to get this setup running asap.Thanks!
-
Hi,
ok, to get your setup running ASAP - would it be possible to use Teamviewer or direct SSH to the controller so we can check what's happening? We will check the extension's firmware version and do the FW update if neccessary.The best time would be between 12:00 and 20:00 CEST.
Thanks,
Martin -
I can give you ssh access ? please mail me at robert at ropesolutions.nl, I will supply you the details.
-
@salorob I just sent you the mail.
-
@martin-kudláček Just a quick question, since I also do have this problem with my xS50: Will there be some easy way to upgrade the firmware of the extension? What is the procedure of updating the firmware? Thanks for your answer!
Regards,
Boris -
@bsc101 The way to check and update the firmware is fairly easy - just connect the extension via RS485 to the controller, ssh into the controller and run a program. I will write down a tutorial how to do so. We just want to be extra sure, that this problem is tied down to the extension's firmware. I do apologize for this incovenience.
-
@martin-kudláček Sounds good, thanks for your efforts!
-
Ok, the issue is definitely with the extension firmware 5.6. The current version is 5.18 and for some reason, both of you received extension units with the old firmware... We do apologize for this, if it is even possible.
The @salorob was able to flash the firmware by his own via our Windows application tool. Unfortunately, the tool is also long time waiting for the update, so the firmware version in this tool is only 5.9, instead of 5.18.
So the official hacker's tutorial is:
- SSH into your controller, the user "pi", the password (if not changed) is "raspberry". If your image is Raspbian, you need to install additional packages:
pi@raspberrypi:~ $ sudo bash root@raspberrypi:/home/pi# echo "deb https://files.unipi.technology/debian stretch main" > /etc/apt/sources.list.d/unipi.list root@raspberrypi:/home/pi# wget -O - https://files.unipi.technology/debian/unipi_pub.gpg | apt-key add root@raspberrypi:/home/pi# apt update root@raspberrypi:/home/pi# apt install -y neuron-firmware neuron-modbus-tools-
Connect the extension to the controller over RS485. If you have multiple extensions, connect only one at a time. Right now, all of them thinks they have address 15, so you need to avoid collisions.
-
Confirm, you have a connection to extension
root@L503-sn101:/home/pi# /opt/neuron-bin/fwserial -p /dev/extcomm/0/0 Boardset: 5 E-14Ro_P-11DiR485 (v1.0) Baseboard: 2 E-14Ro (v1.0) Firmware: v5.6 Modbus timeout set- Flash the firmware
root@L503-sn101:/opt/fw# /opt/neuron-bin/fwserial -p /dev/extcomm/0/0 -PR Boardset: 5 E-14Ro_P-11DiR485 (v1.0) Baseboard: 2 E-14Ro (v1.0) Firmware: v5.6 Modbus timeout set Programming page 00 ...Finished programming chunk 0, ret: 64 err: 0 Finished programming chunk 1, ret: 64 err: 0 Finished programming chunk 2, ret: 64 err: 0 Finished programming chunk 3, ret: 64 err: 0 Finished programming chunk 4, ret: 64 err: 0 Finished programming chunk 5, ret: 64 err: 0 Finished programming chunk 6, ret: 64 err: 0 Finished programming chunk 7, ret: 64 err: 0 Page written OK. Programming page 01 ...Finished programming chunk 0, ret: 64 err: 0 ..........- Verify the firmware. Since the flashed firmware now accepts address set by DIP switches, you need to specify the address in the parameter -u. My extension has address 3
root@L503-sn101:/opt/fw# /opt/neuron-bin/fwserial -p /dev/extcomm/0/0 -u 3 Boardset: 5 E-14Ro_P-11DiR485 (v1.0) Baseboard: 2 E-14Ro (v1.0) Firmware: v5.18 Modbus timeout set- Repeat the process for all of the extensions
Let me know, how it worked. If you don't want to flash the firmware yourself, let me know and we can arrange some remote session with you.
Thanks,
Martin